SwiftUI의 View 정렬
Apple은 지난 WWDC 2019에서 Swift의 기능을 극한까지 활용한 UI framework인
SwiftUI를 내놓았다.
오히려 역으로, SwiftUI를 위해
Swift에
새로운
기능들을
넣기까지 하였다.
이로써 Objective-C 위에 만들어진 UIKit에서 써야했던 절차적인
방식–@objc func와 #selector–을 property wrapper @State와 @Binding
등을 사용한 반응형 view를 설계할 수 있게 되었다.
또한 지난 포스트에서
소개하였듯 이런 SwiftUI의 특징 덕분에 기존의 MVC, VIPER 등의 디자인 패턴이
obsolete하게 되었다.
SwiftUI에서 간단한 layout은 HStack, VStack, 그리고 ZStack을 활용하여
매우 간단하게 구성할 수 있다.
그러나 이 세상에 ‘완벽한 도구’가 있을 수는 없는 법.
SwiftUI를 처음 접하고 30분 정도 실험하다 보면, 분명히 난관에 맞닥뜨릴 것이다.
그러곤, “SwiftUI의 마법으로 이 문제를 해결할 수 있을거야!”라고 생각한다면
오산이다.
SwiftUI에서는 UIKit의 autolayout으로 간단히 해결할 수 있는 문제를 다루기가
까다로운 경우가 많기 때문이다.
특히 구체적인 수치를 기반으로 view를 짜야 한다면 말이다.
하지만, 프로그래밍의 세계에서 불가능?!은 없는 법. 이번 포스트에서는 SwiftUI에서 까다로운 view 정렬에 대해서 알아본다.
문제 상황
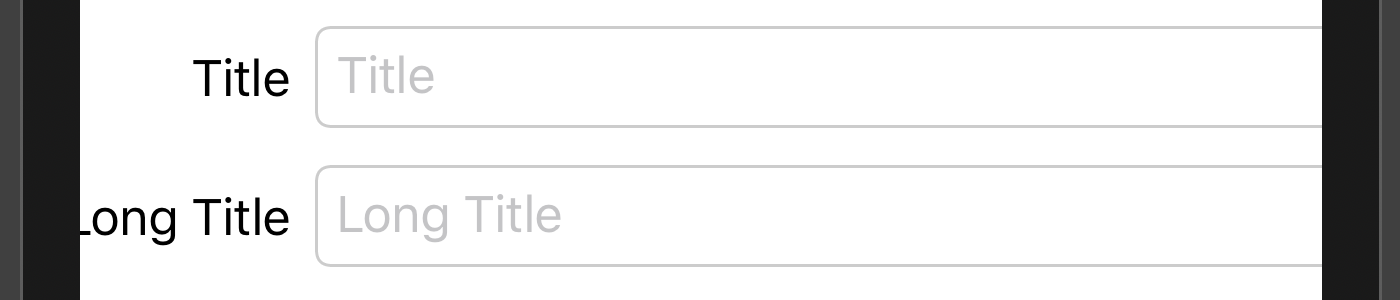
iOS에서 다음과 같은 코드를 실행하면:
struct ContentView: View {
    @State private var text1 = ""
    @State private var text2 = ""

    var body: some View {
        VStack {
            HStack {
                Text("Title")
                TextField("Title", text: $text1)
            }
            HStack {
                Text("Long Title")
                TextField("Long Title", text: $text2)
            }
        }
        .textFieldStyle(RoundedBorderTextFieldStyle())
        .padding()
    }
}
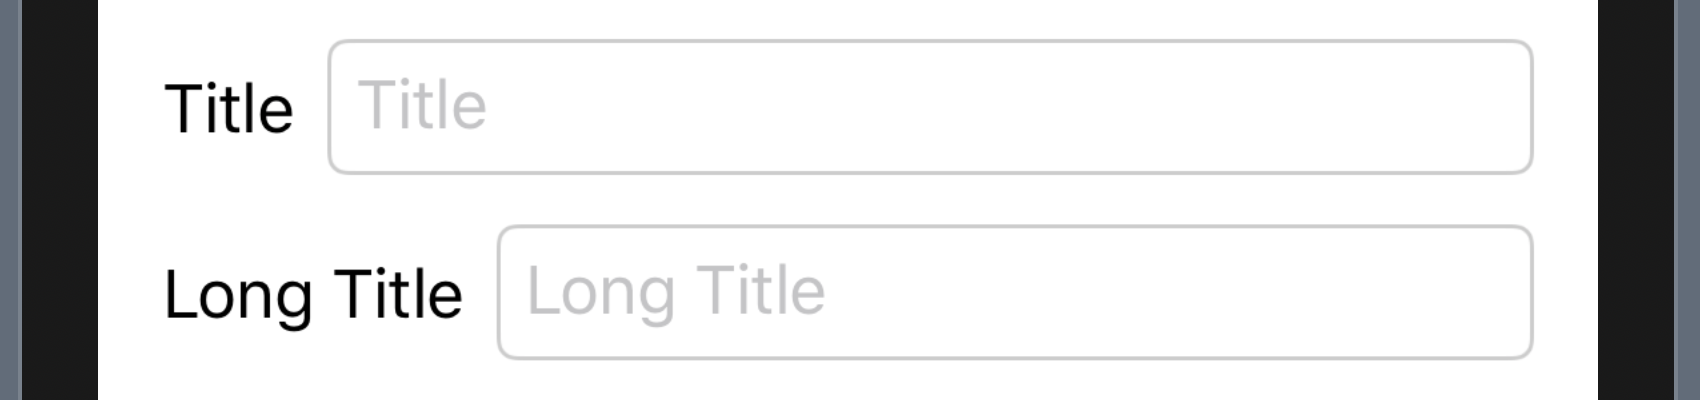
위와 같이 Title과 Long Title의 끝이 맞지 않는 것을 볼 수 있다.
가장 간단하고도 빠른 해결법은 Title과 Long Title의 frame을 직접 정해주는
것이다.
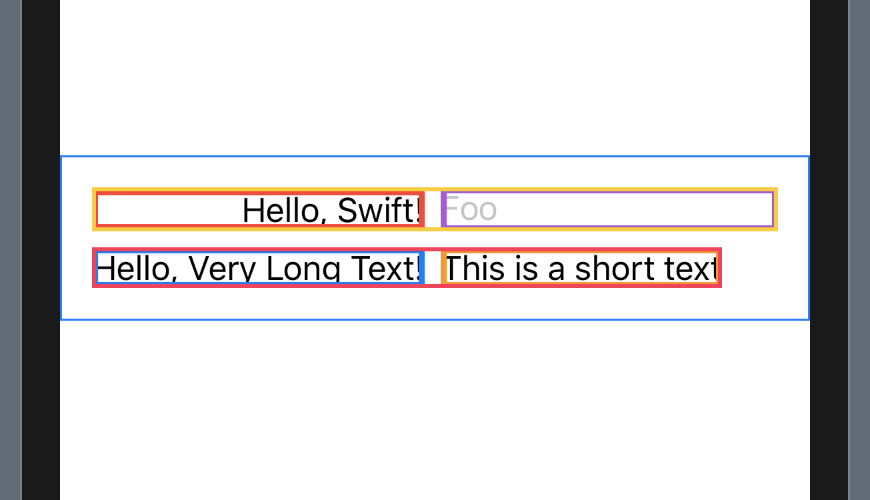
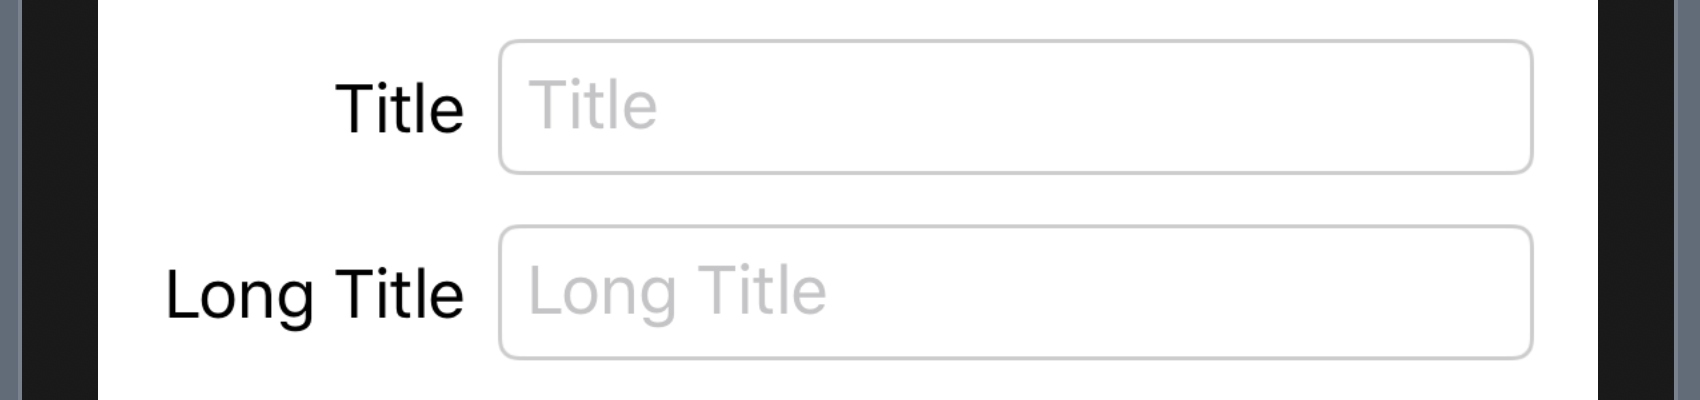
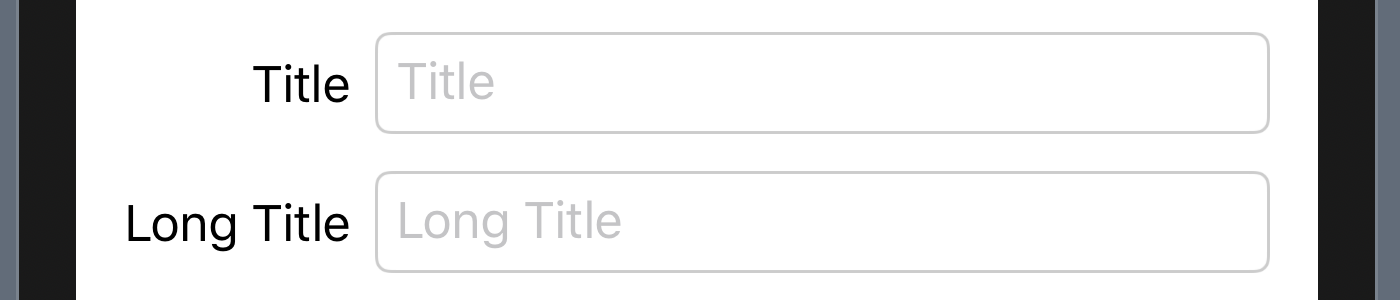
이 경우, .frame(width: 76, alignment: .trailing)를 각 Text에 적용하면 아래
그림과 같이 된다:
그러나 이런 방식으로는, Text의 내용이 바뀌거나, 다른 글꼴을 쓰도록 고칠
때마다 새로운 frame 너비를 직접 찾아줘야 한다.
자동으로 ‘Title’과 ‘Long Title’의 끝을 맞출 수는 없을까?
또 다른 간단한 방식으로는 VStack과 HStack의 위치를 뒤바꿔 다음과 같이 하는 것이다:
HStack {
    VStack(alignment: .trailing, spacing: 24) {
        Text("Title")
        Text("Long Title")
    }
    VStack {
        TextField("Title", text: $text)
        TextField("Long Title", text: $text)
    }
}
그러나 이 경우에도 VStack의 spacing 값을 직접 조정해줘야 한다는 문제가
있다.
나아가, 의미상으로도 Text(Title)은 TextField("Title", text: $text)의
header이기 때문에 같은 group에 묶여 있으면 좋을 것이다.
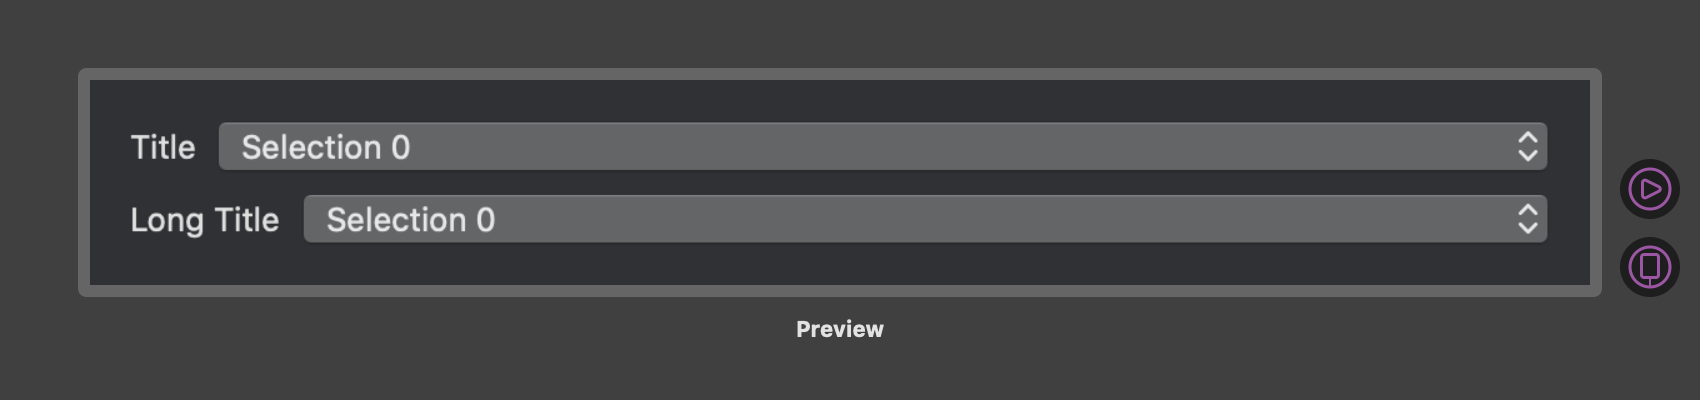
이러한 정렬은 macOS에서 Picker를 쓸 때도 문제가 된다:
struct ContentView: View {
    @State private var selection1 = 0
    @State private var selection2 = 0
    @State private var integers = [0, 1, 2, 3, 4, 5]

    var body: some View {
        VStack(alignment: .labelTrailingAlignment) {
            Picker("Title", selection: self.$selection1) {
                ForEach(integers, id: \.self) {
                    Text("Selection \($0)")
                }
            }

            Picker("Long Title", selection: self.$selection2) {
                ForEach(integers, id: \.self) {
                    Text("Selection \($0)")
                }
            }
        }
        .padding()
    }
}
다만 macOS의 Picker의 경우 이 포스트에서 제시할 해결법을 적용하려면
.labelsHidden()을 적용한 후 별도의 Text로 앞에 “Title”과 “Long Title”의
부분을 넣어주어야 한다.
Alignments
우리가 하고 싶은 것은, “Title”과 “Long Title”의 오른쪽 끝을 같은 선에 정렬하는
것이다.
이런 상황에서 alignment를 쓸 수 있다.
사실 alignment는 SwiftUI에서 HStack, VStack, 그리고 ZStack을 써보았다면
들어보거나 직접 사용하였을 것이다.
.trailing, .bottom 등이 각각 HorizontalAlignment와 VerticalAlignment의
static 변수이다.
이외에도 직접 Alignment를 정의해줄 수 있는데, 이를 위해서는
AlignmentID의 문서를
통해 방법을 어렴풋이 알 수 있다.
인용하자면,
Types conforming to AlignmentID have a corresponding alignment guide value, typically declared as a static constant property of HorizontalAlignment or VerticalAlignment. 이라고 한다.
“Title”과 “Long Title”의 가로 위치를 조절하고 싶으므로 HorizontalAlignment를
사용하면 된다.
먼저 새로운 alignment를 위한 AlignmentID를 만들어야 하는데,
LabelTrailingAlignment라고 이름 짓자.
AlignmentID에 conform하기 위해서는
static func defaultValue(in context: ViewDimensions) -> CGFloat을 구현해주면
된다:
extension HorizontalAlignment {
    private enum LabelTrailingAlignment: AlignmentID {
        static func defaultValue(in context: ViewDimensions) -> CGFloat {
            // Does not matter
            context[.trailing]
        }
    }
}
주석에 적어두었는데, context[.trailing]은 필요하기 때문에 적어놓았지만 우리는
사용하지 않을 dummy value이다.
이제 새로운 alignment를 통해 VStack 안의 HStack에 쌓여 있는 view를 기준으로
맨 바깥의 VStack을 정렬할 수 있다.
무슨 말이냐면,
//  HorizontalAlignment+labelTrailingAlignment.swift
extension HorizontalAlignment {
    // 위에 정의한 private enum 생략
    static let labelTrailingAlignment = HorizontalAlignment(
        LabelTrailingAlignment.self
    )
}

//  ContentView.swift
struct ContentView: View {
    @State private var text = ""

    var body: some View {
        VStack(alignment: .labelTrailingAlignment) {
            HStack {
                Text("Title")
                    .alignmentGuide(.labelTrailingAlignment) { $0[.trailing] }
                TextField("Title", text: $text)
            }

            HStack {
                Text("Long Title")
                    .alignmentGuide(.labelTrailingAlignment) { $0[.trailing] }
                TextField("Long Title", text: $text)
            }
        }
        .textFieldStyle(RoundedBorderTextFieldStyle())
        .padding()
    }
}
와 같이 하는 것이다.
여기서 중요한 부분은 Text("Title")과 Text("Long Title") 뒤에 붙인
.alignmentGuide method인데, 이 부분이 우리가 새로 정의한
.labelTrailingAlignment의 값을 정해주는 부분이다.
맨 바깥 VStack의 정렬 기준을 .labelTrailingAlignment으로 해주고 안의
view들은 두 Text만 이 alignment 기준을 지정하였으므로 제대로 정렬이 되는
것이다.
이때 alignmentGuide의 signature은 다음과 같다:
@inlinable public func alignmentGuide(
    _ g: HorizontalAlignment,
    computeValue: @escaping (ViewDimensions) -> CGFloat
) -> some View
뒤에 인자로 사용한 $0의 type이 ViewDimensions인데, 이는 우리가 정렬을 위해
사용할 수 있는 view의 수치를 담고 있다.
우리는 .labelTrailingAlignment에게 Text("Title")과 Text("Long Title")의
끝을 정렬 기준으로 넘겨주고 싶기 때문에 $0[.trailing]을 반환한 것이다.
이 반환 값은 별게 아닌 CGFloat로, $0[.trailing]은 Text의 너비이다.
그렇기 때문에 사실 $0[.trailing] 대신 $0.width를 통해 직접 값을 넘겨주어도
동일한 결과를 얻을 수 있다.
나아가서 ViewDimensions에는 height의 값도 있으며,
HorizontalAlignment.trailing 이외에도 subscript로 VerticalAlignment와
HorizontalAlignment의 값들을 모두 읽어올 수 있다.
그런데 이 결과는 역시 우리가 원하는 모습과 거리가 있다:
이 결과는 child view가 자신의 크기를 정한 이후, parent view는 반드시 그 크기를 수용해야하는 SwiftUI의 특징에서 기인한다. Alignment가 정해지기 전 크기를 정하고, 그 후에 parent view가 정렬을 하기 때문에 child view의 일부가 화면을 벗어나는 것이다. 이를 해결하는 것은 지금까지 언급한 범위 안에서도 할 수 있다. 그러나 Preference를 사용한 좀 더 일반적이고 효율적인 방법이 있으니, 먼저 간단한 방법을 소개한 후 이를 소개하도록 한다.
간단한 Ad-Hoc 해결법
SwiftUI는 parent view가 child view(s)에게 크기를 제시한 뒤, child view가 정한
크기를 반드시 수용한다.
그렇기 때문에 우리는 모종의 방법으로 child view에게 크기를 재조정하도록
요청해야 한다.
우리는 Text("Title")과 Text("Long Title")의 너비가 같도록 하고 싶다.
그러면, 둘 중 너비가 큰 값으로 이 둘의 크기를 정하면 된다.
(이는 뒤에 제시할 일반적인 방법에서도 마찬가지다.)
@State private var maxTextWidth: CGFloat?
을 ContentView에 도입하자.
그리고 예상하듯이
// 생략
Text("Title")
    .frame(width: maxTextWidth, alignment: .trailing)
// 생략
Text("Long Title")
    .frame(width: maxTextWidth, alignment: .trailing)
과 같이 frame을 정해준다.
이때 Text("Title")의 너비가 Text("Long Title")보다 좁을 것이 분명한데,
“Title”이 Text의 넓은 frame에서 덩그러니 가운데에 있으면 안되기 때문에
, alignment: .trailing을 주었다.
이제 maxTextWidth에 적절한 값을 넣어주면, SwiftUI가 알아서 변화를 감지하여
재조정을 할 것이다.
지금까지 글을 유심히 읽으신 독자분들은 위에 강조처리한 alignmentGuide가 받는
closure의 반환값이 CGFloat라는 사실을 기억할 것이다.
.alignmentGuide(.labelTrailingAlignment) { d in
    DispatchQueue.main.async {
        if let maxTextWidth = self.maxTextWidth {
            self.maxTextWidth = max(maxTextWidth, d.width)
        } else {
            self.maxTextWidth = d.width
        }
    }
    return d[.trailing]  // d.width와 동일
}
를 Text("Title")과 Text("Long Title")의 .frame 바로 뒤에 붙여주면 된다.
여기에 지저분한 DispatchQueue.main.async가 들어간 이유는, SwiftUI가 view를
rendering하는 순간에 @State를 바꾸면 문제가 생기기 때문이다.
따라서 SwiftUI가 view를 rendering한 후에 @State를 바꾸려면 이와 같은
gimmick을 써야 한다.
궁금한 독자들은 이 비동기 코드를 주석처리한 후 실행하면, Xcode가 친절하게
[SwiftUI] Modifying state during view update, this will cause undefined behavior.
라는 경고를 띄워준다.
지금까지의 코드는 아래와 같다:
struct ContentView: View {
    @State private var text = ""
    @State private var maxTextWidth: CGFloat?

    var body: some View {
        VStack(alignment: .labelTrailingAlignment) {
            HStack {
                Text("Title")
                    .frame(width: maxTextWidth, alignment: .trailing)
                    .alignmentGuide(.labelTrailingAlignment) { d in
                        DispatchQueue.main.async {
                            if let maxTextWidth = self.maxTextWidth {
                                self.maxTextWidth = max(maxTextWidth, d.width)
                            } else {
                                self.maxTextWidth = d.width
                            }
                        }
                        return d[.trailing]
                    }
                TextField("Title", text: $text)
            }

            HStack {
                Text("Long Title")
                    .frame(width: maxTextWidth, alignment: .trailing)
                    .alignmentGuide(.labelTrailingAlignment) { d in
                        DispatchQueue.main.async {
                            if let maxTextWidth = self.maxTextWidth {
                                self.maxTextWidth = max(maxTextWidth, d.width)
                            } else {
                                self.maxTextWidth = d.width
                            }
                        }
                        return d[.trailing]
                    }
                TextField("Long Title", text: $text)
            }
        }
        .textFieldStyle(RoundedBorderTextFieldStyle())
        .padding()
    }
}
결과는 우리가 원하는 바와 같다:
문제점
그러나 이는 suboptimal하다.
아래와 같이 ContentView에 static counter를 더한 후 maxTextWidth이 몇
번이나 정해지는지 보자:
private static var count = 0
@State private var maxTextWidth: CGFloat? {
    didSet {
        Self.count += 1
        print(Self.count)
    }
}
앞으로 SwiftUI API 변화에 따라 얼마나 바뀔지는 모르겠지만, 필자의 Xcode에서는
무려 14번이나 이 값을 변경한다.
단 두 개의 Text를 정렬하기 위해서 이런 비효율은 좋지 않다.
나아가 우리는 잠재적으로 훨씬 많은 수의 view들을 정렬하고 싶기 때문에, 다른
해결책을 강구하여야 한다.
다행히, 이런 문제를 해결하는 일반적인 방법이 있다.
Preference, Anchor, GeometryReader
일반적으로, SwiftUI에서 child view가 parent view에게 값을 전달하는 방식은
Preference를 매개로 한다.
특히 우리의 문제 상황에서는 child view가 parent view에게 자신의 크기를
전달해주면 좋을 것이다.
이런 상황에 anchorPreference와 Anchor을 쓸 수 있다.
놀랍게도 anchorPreference는 개발자 문서가 없다.
Signature은 정말이지…
@inlinable public func anchorPreference<A, K>(
    key _: K.Type = K.self,
    value: Anchor<A>.Source,
    transform: @escaping (Anchor<A>) -> K.Value
) -> some View where K : PreferenceKey
당황스러운 마음을 추스리고, Anchor의 개발자 문서를 읽자면:
An opaque value derived from an anchor source and a particular view.
It may be converted to a
Valuein the coordinate space of a target view, using aGeometryProxyvalue to specify the target view.
뭔가 GeometryProxy (GeometryReader의 closure 인자가 받는 인자)와 같이 써서
Value를 얻을 수 있다고 한다.
이 Value는 generic인 Anchor<Value>의 Value이다.
그런데 Value가 무엇인지 알기 위해서는 Anchor.Source의 문서를 읽어보아야
한다:
A type-erased geometry value that produces an anchored value of type
Value.Anchored geometry values are passed around the view tree via preference keys, and then converted back into the local coordinate space via a
GeometryProxyvalue.
유심히 보면 이 Anchor.Source라는 것은 다름 아닌 Value 그 자체인데, 다만
type이 지워진 상태이다.
이는 preference keys를 매개로 돌아다닌다는데, 이는 PreferenceKey를 말하는
것이다.
무슨 말인지 하나도 이해가 안되더라도, 조금만 참자.
곧 모든 것이 명확해질 것이다!
마지막으로 PreferenceKey의 문서를 보면:
A named value produced by a view.
Views with multiple children automatically combine all child values into a single value visible to their ancestors.
View가 만드는 값이라고 한다. 굉장히 모호하게 들리는 말이다. “무슨 값이라는 것인가?”라고 물을 수밖에 없는데, 재밌게도 ‘값’이라고 할 수 밖에 없는 것이, 어떠한 값이어도 상관 없기 때문이다.
PreferenceKey
계속 강조하는 것이지만, SwiftUI에서 parent view는 child view가 정한 크기를 그대로 수용해야 하지만, 이러한 경직성을 극복하기 위해 child view가 parent view에게 어떠한 종류의 값이든지 넘길 수 있게 되어 있다. Child view의 ‘취향’을 넘겨주는 것이다. 그러면 parent view는 child view들의 ‘취향’들을 모두 취합하여 적절하게 사용한다.
이렇게 전달되는 preference는 아무 값이나 될 수 있기 때문에, ‘어떤’
preference인가를 나타내는 key가 PreferenceKey인 것이다.
각 child view는 다양한 ‘취향’들을 PreferenceKey를 key로 하는 key-value pair로
parent view에게 전달한다.
우리의 경우에는 child view의 크기를 parent view에게 전달하고 싶은 것인데,
child view는 (예컨대) 자신이 생성된 시각을 parent view에게 Date로 전달해줄
수도 있는 것이다.
Anchor.Source
Anchor는 initializer가 없다.
앞에 나왔던 무시무시한 anchorPreference가 주는 값을 쓸 수 밖에 없다.
불행 중 다행으로, Anchor<Value>는 두 종류밖에 없다.
Anchor<CGRect>와 Anchor<CGPoint>이다.
(물론 Anchor<Int?>와 같이 무의미한 type을 만들 수는 있지만, 우리는
Anchor<Int?>.Source만 조작할 수 있을 뿐 Anchor<Int?>에 접근할 수 있는
property나 method가 없으므로 실질적으로 두 종류이다.)
아까 보았던 ViewDimensions과 거의 역할이 유사한데, Anchor<CGRect> 버전은
단순한 CGFloat가 아니라 나중에 GeometryProxy가 사용할 수 있는 값을 담고
있다.
우리는 child view의 크기를 전달하고 싶기 때문에 .bounds property를 사용할
것이다.
만약 child view의 특점 위치를 전달하고 싶으면, Anchor<CGPoint>.Source의
.bottomLeading 같은 값을 쓰면 된다.
아직도 이 복잡한 관계들이 파악이 쉽게 되지 않을 텐데, 실제 anchorPreference의
작동과 사용을 보면 더 명확해질 것이다.
anchorPreference
anchorPreference를 쓰기 위해서는 .bounds property를 child view의 ‘취향’으로
전달할 때 사용할 PreferenceKey를 만들어야 한다.
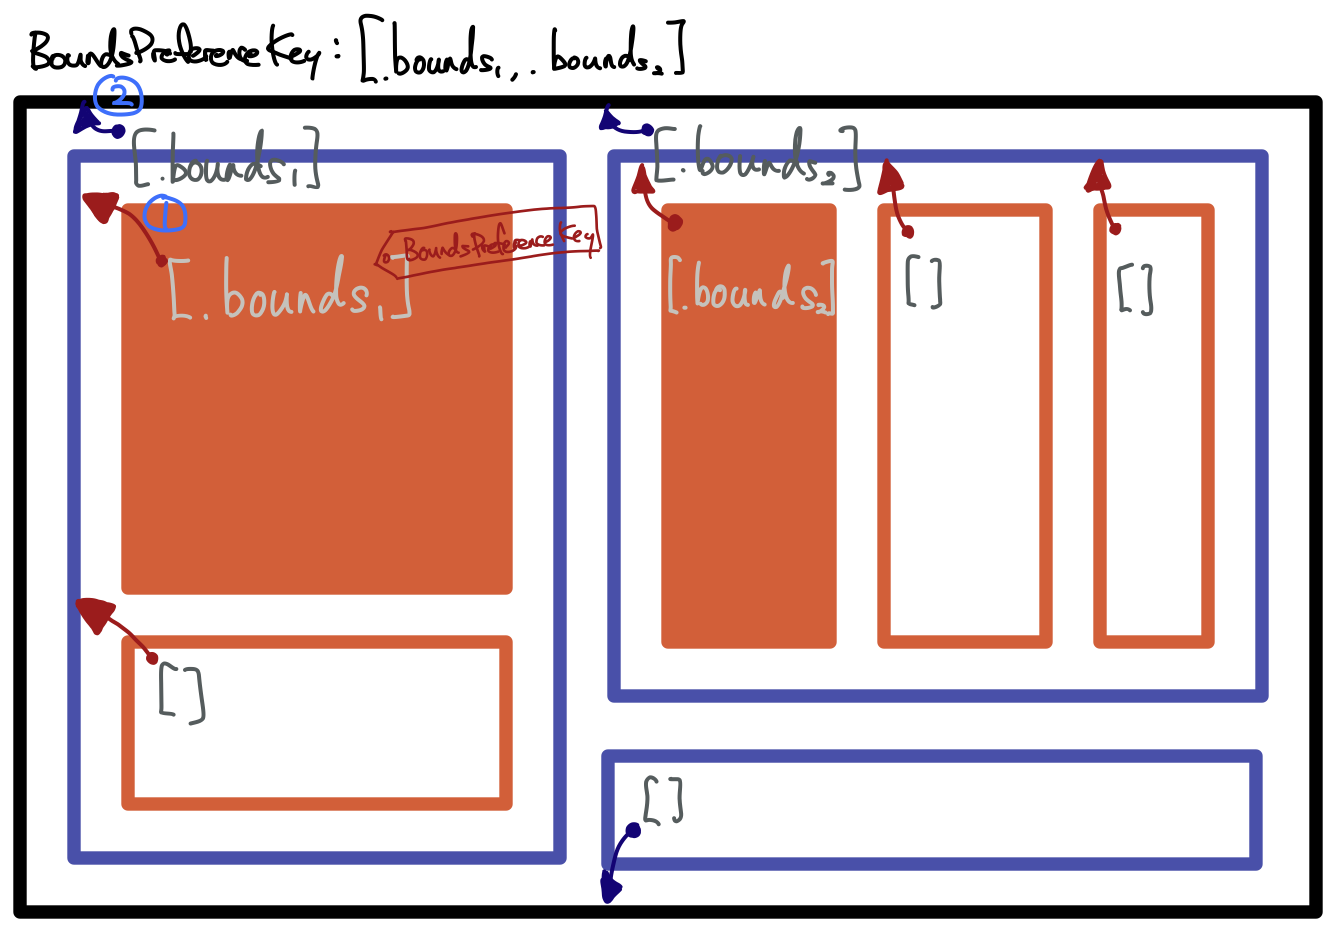
우리는 bounds를 전달할 것이니 BoundsPreferenceKey라는 이름을 사용하였다:
struct BoundsPreferenceKey: PreferenceKey {
    static var defaultValue = [BoundsPreference]()

    static func reduce(
        value: inout [BoundsPreference],
        nextValue: () -> [BoundsPreference]
    ) {
        value.append(contentsOf: nextValue())
    }
}
위에 구현한 내용은 PreferenceKey protocol에 conform하기 위한 필요 조건이다.
defaultValue는 말 그대로 기본값으로, anchorPreference를 전달하지 않는
view가 내뱉는 값이다.
이때 BoundsPreference는
struct BoundsPreference {
    let bounds: Anchor<CGRect>
}
처럼 Anchor<CGRect>를 감싸는 아주 단순한 struct이다.
여기서 BoundsPreference가 PreferenceKey를 따를 때 associatedtype이
BoundsPreference가 아니라 [BoundsPreference]인 이유는 child view들이 각각
BoundsPreference를 parent view에게 전달하면 parent view는 이를 array로 묶어
처리할 것이기 때문이다.
(사실 BoundsPreference? 같은 type을 써도 되는데, 구현이 다소 복잡해진다.)
그래서 child view도 그냥 BoundsPreference가 아니라 [BoundsPreference]로
전달해야 한다.
모순적으로 들릴 수도 있지만, child view도 자신의 child view들에게는 parent
view이기 때문이다.
reduce method는 parent view가 [BoundsPreference]를 취합하는 방식이다.
위 과정을 요약한 도식은 다음과 같다 (아래 구현을 보면 알겠지만 완전히 정확한
표현은 아니지만, data flow는 동일하다.):
GeometryReader와 GeometryProxy
지금까지의 난관을 잘 헤쳐왔다면, 이제는 비교적 간단한 GeometryReader와
GeometryProxy만 남았다.
GeometryReader는 child view에게 자신의 size를 포함한 값들, 즉 geometry를
전달해주는 view이다.
Child view는 GeometryProxy를 매개로 하여 값을 읽어올 수 있다.
아주 간단한 예시로는,
GeometryReader { (geometry: GeometryProxy) in
    Rectangle()
        .frame(
            width: geometry.size.width / 2,
            height: geometry.size.width / 2
        )
}
와 같이 쓸 수 있다.
GeometryProxy의 size property는 별도의 설명이 필요 없을 만큼 하는 일과
목적이 명확하다고 생각한다.
다만
public subscript<T>(anchor: Anchor<T>) -> T { get }
이 문제인데, 이미 Anchor를 소개하였기 때문에 그리 복잡하지 않다.
위에서 Anchor의 가장 독특하고도 까다로운 점이 안에 CGRect와 CGPoint를
우리가 직접 조작하거나 만들 수 없다는 것이었다.
그럼 값을 어떻게 쓰는가?
바로 GeometryProxy의 [] 연산자, 즉 subscript를 통해서 Anchor<T>의
T를 꺼낼 수 있다!
위의 signature를 보면 알 수 있듯, GeometryProxy인 geometry와
Anchor<CGRect>인 anchor가 있다면, geometry[anchor.bounds]와 같이 해당
CGRect를 꺼낼 수 있다.
이제 거의 다 왔다.
GeometryReader를 쓸 때 주의할 점은, GeometryReader는 자신에게 주어진 크기를
전부 사용하기 때문에 간혹 view가 화면을 꽉 채우는 경우가 있다.
이러한 경우 GeometryReader를 parent view의 background로 사용해도 되는
경우라면 문제를 해결할 수 있다.
아래의 구현에서는 화면을 채우는 문제와 무관하게 GeometryReader를 background로
사용할 것이다.
이제 중첩된 view를 정렬하도록 하자!
Finale
Text("Title")과 Text("Long Title")이 자신의 .bounds를 넘겨주면 된다:
Text("Title")
    .frame(width: maxTextWidth, alignment: .trailing)
    .alignmentGuide(.labelTrailingAlignment) { $0[.trailing] }
    .anchorPreference(
        key: BoundsPreferenceKey.self,
        value: .bounds
    ) {
        [BoundsPreference(bounds: $0)]
    }
// Text("Long Title")도 동일
이렇게 전달된 [BoundsPreference]를 취합하는 것은 바깥의 VStack에서 해주면
된다.
일반적인 preference 값이었으면 VStack에
@inlinable public func onPreferenceChange<K>(
    _ key: K.Type = K.self,
    perform action: @escaping (K.Value) -> Void
) -> some View where K : PreferenceKey, K.Value : Equatable
을 사용하여 VStack {...}.onPreferenceChange(BoundsPreferenceKey.self) {...}와
같이 사용하였겠지만, BoundsPreferenceKey.Value인 [BoundsPreference]은
BoundsPreference의 bounds: Anchor<CGRect>가 Equatable이 아니기 때문에 쓸
수 없다.
그러므로 일반적인 preference는 위 method를 쓰면 되는데, 이 경우는
@inlinable public func backgroundPreferenceValue<Key, T>(
    _ key: Key.Type = Key.self,
    @ViewBuilder _ transform: @escaping (Key.Value) -> T
) -> some View where Key : PreferenceKey, T : View
을 쓸 수 있다.
이 method는 preference를 가지고 background view를 만들 때 사용한다.
동일하게 overlay를 만드는 버전도 있다.
우리는 background를 만드려는 것이 아니지만, GeometryReader을 background로
하여 [BoundsPreference]를 읽어올 수 있다!
VStack 맨 뒤에 다음과 같이 작성해준다:
.backgroundPreferenceValue(BoundsPreferenceKey.self) { values in
    GeometryReader { geometry in
        self.readWidth(from: values, in: geometry)
    }
}
이때 readWidth는 ContentView에 더해준 private method로,
private func readWidth(
    from values: [BoundsPreference],
    in geometry: GeometryProxy
) -> some View {
    DispatchQueue.main.async {
        self.maxTextWidth = values
            .map { geometry[$0.bounds].width }
            .max()
    }
    return Rectangle()
        .hidden()
}
와 같다.
차근차근 보자면, VStack은 child view에게서 받아온 preference 값 (이 경우에는
두 Text가 보내온 길이 2인 [BoundsPreference])을 가지고 작업을 하기 위해
.babackgroundPreferenceValue method를 사용하였다.
우리의 ‘취향’은 BoundsPreferenceKey를 일종의 ‘id’, 즉 key로 사용하였기 때문에
이를 알려주고, backgroundPreferenceValue는 결국 background view를 만드는
함수이기 때문에 GeometryReader를 사용하면 된다.
GeometryReader는 GeometryProxy를 받아 View를 반환하기 때문에, 우리는
dummy view를 반환하면서 preference를 가지고 @State maxTextWidth를 조작하면
된다.
GeometryReader의 closure 인자 안에서 직접 @State maxTextWidth를 조작하려고
하면 Swift compiler가 당황하기 때문에, 이 작업은 함수로 추출하여 진행한다.
이것이 readWidth 함수인데, [BoundsPreference]와 GeometryProxy를 받아서
실질적인 작업을 한다.
이전에 .alignmentGuide 안에서 하였던 것처럼 DispatchQueue.main.async 안에서
maxTextWidth를 바꿔야 한다.
values가 바로 Text("Title")과 Text("Long Title")이 .anchorPreference
method에서 전달해준 Anchor<CGRect>를 감싸는 BoundsPreference들이 들어있는
값이다.
따라서 각각의 BoundsPreference를 먼저 geometry에 넣어 CGRect로 변환해준
후(.map안의 geometry[$0.bounds]), width들의 array로 변환한다.
이후 최대값을 골라 self.maxTextWidth에 넣으면 끝!
마지막으로 GeometryReader의 closure 인자가 요구하는 View를 반환해야 하는데,
EmptyView를 반환하면 SwiftUI가 너무 똑똑하게 무시하고 넘어가기 때문에…
Rectangle().hidden()을 반환한다.
이렇게 나온 결과물은
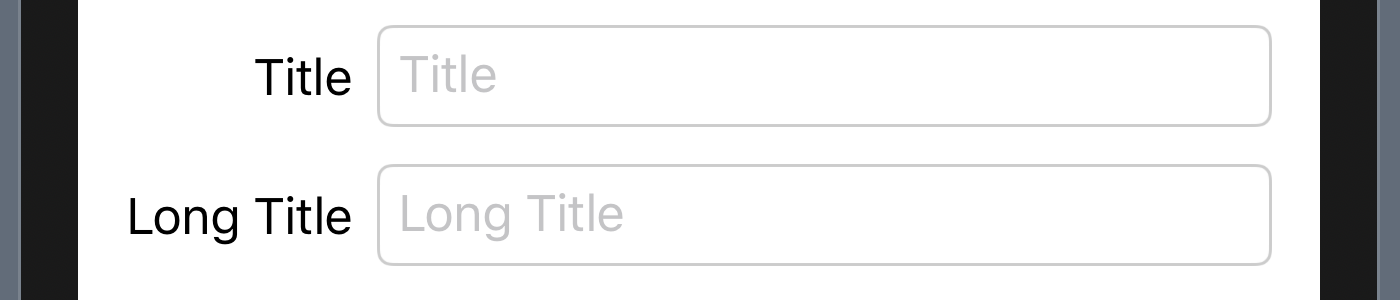 이다.
아까
이다.
아까 .alignmentGuide 안에서 한 것과 똑같아 감흥이 없다면, static counter로
@State maxTextWidth가 얼마나 씌어지는지 세어보면 딱 두 번이 나온다.
마지막으로 전체 코드를 적기 전에, Text("Title")과 Text("Long Title")의
논리가 완벽히 일치하기 때문에 다음과 같이 추출하였다:
private func wrappedText(_ text: String) -> some View {
    Text(text)
        .frame(width: maxTextWidth, alignment: .trailing)
        .alignmentGuide(.labelTrailingAlignment) { $0[.trailing] }
        .anchorPreference(
            key: BoundsPreferenceKey.self,
            value: .bounds
        ) {
            [BoundsPreference(bounds: $0)]
        }
}
전체 ContentView의 코드는 다음과 같다:
struct ContentView: View {
    private static var count = 0

    @State private var maxTextWidth: CGFloat? {
        didSet {
            Self.count += 1
            print(Self.count)
        }
    }

    @State private var text = ""

    var body: some View {
        VStack(alignment: .labelTrailingAlignment) {
            HStack {
                wrappedText("Title")
                TextField("Title", text: $text)
            }

            HStack {
                wrappedText("Long Title")
                TextField("Long Title", text: $text)
            }
        }
        .textFieldStyle(RoundedBorderTextFieldStyle())
        .padding()
        .backgroundPreferenceValue(BoundsPreferenceKey.self) { values in
            GeometryReader { (geometry: GeometryProxy) in
                self.readWidth(from: values, in: geometry)
            }
        }
    }

    private func wrappedText(_ text: String) -> some View {
        Text(text)
            .frame(width: maxTextWidth, alignment: .trailing)
            .alignmentGuide(.labelTrailingAlignment) { $0[.trailing] }
            .anchorPreference(
                key: BoundsPreferenceKey.self,
                value: .bounds
            ) {
                [BoundsPreference(bounds: $0)]
            }
    }

    private func readWidth(
        from values: [BoundsPreference],
        in geometry: GeometryProxy
    ) -> some View {
        DispatchQueue.main.async {
            self.maxTextWidth = values
                .map { geometry[$0.bounds].width }
                .max()
        }
        return Rectangle()
            .hidden()
    }
}
Updates
macOS에서는 window의 크기 조절이 자유롭기 때문에, window가 너무 좁을 경우
Text 자체가 사라지는 경우가 있다.
이는 wrappedText의 Text(text)에 .layoutPriority(1)을 더해주면 된다.
Text가 가장 먼저 parent view가 제시한 공간을 쓸 수 있도록 우선 순위를 높여준
것이다.
기본값은 0이다.
본 포스트에서는 iOS 예시만 보였지만, macOS에서 Picker을 사용한 예시를 포함한
완성된 코드는 GitHub에서
확인할 수 있다.